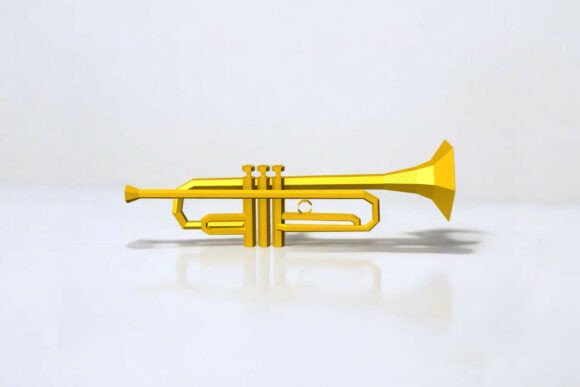
Trumpet - 3d Papercraft
There is something undeniably magical about transforming a flat sheet of paper into a three-dimensional object that holds shape, color, and presence. The Trumpet - 3d Papercraft project is not just a simple craft; it is an exercise in precision, patience, and creative satisfaction. Whether you are looking for a unique home decoration, a thoughtful handmade gift, or a challenging afternoon project to disconnect from screens, this digital papercraft offers a rewarding experience. With an assembled size of 20 x 16 x 60 CMS, the final piece makes a bold visual statement, standing tall enough to be a centerpiece yet detailed enough to appreciate up close.
The Assembly Experience: A Meditative Process
Before diving into the "how-to," it is important to understand the journey. The estimated assembling time for this specific trumpet model is approximately 3 hours. This duration is designed to be manageable for most adults but substantial enough to provide a sense of accomplishment. Unlike mass-produced items, this project requires your hands-on involvement at every step, turning the act of creation into a form of mindfulness.
The process begins with printing. You will receive a comprehensive package containing PDF, DXF, EPS, PNG, and JPG formats. This versatility ensures that regardless of your preferred software or printer type, you can access the templates easily. However, the magic happens when you move from screen to paper. The key to a professional-looking result lies in the preparation of your materials. While standard printer paper might seem like a quick option, using A4 Letter Cardstock Paper is highly recommended. Cardstock provides the necessary rigidity to hold the trumpet’s curve without sagging, ensuring that the 60cm height remains sturdy and impressive once assembled.
Real-World Applications and Use Cases
Why build a papercraft trumpet? Beyond the sheer joy of construction, this project serves various practical and aesthetic purposes in everyday life. Here is how different users find value in this specific design:
- Home Decor Enthusiasts: For those who love eclectic or bohemian interior styles, a large-scale papercraft trumpet adds an artistic flair to living rooms, studies, or entryways. Its geometric lines and potential for colorful customization allow it to blend seamlessly with modern art pieces or vintage furniture.
- Event Planners and Party Hosts: Imagine a birthday party, a music-themed event, or a classroom celebration. A giant papercraft trumpet serves as an eye-catching prop or backdrop element. It is lightweight, making it easy to transport between venues, and significantly cheaper than hiring professional inflatable decorations.
- Educators and Parents: For parents seeking screen-free activities for older children (with supervision) or adult learners exploring geometry and spatial reasoning, this project is ideal. It teaches precision cutting, scoring, and structural integrity. Teachers can use it in art classes to discuss scale, perspective, and the history of musical instruments through a tactile medium.
- Gift Givers: In a world of generic store-bought gifts, a hand-assembled papercraft trumpet stands out. It shows effort and care. You can customize the color scheme to match the recipient’s favorite team, brand colors, or wedding theme, making it a deeply personal present.
Gathering Your Tools: What You Need
To ensure your assembly goes smoothly, having the right tools on hand makes a significant difference. You do not need expensive equipment, but you do need precision. Here is a checklist of essentials:
- Colored Printer: Since the aesthetic appeal relies heavily on color, a high-quality color printer is essential. If you prefer monochrome designs, black and white works beautifully too, especially if you plan to paint or decorate after assembly.
- Cardstock Paper: As mentioned, A4 Letter Cardstock is the gold standard here. It balances flexibility for folding with strength for structure.
- Cutting Tools: Sharp scissors are needed for rough cuts, but a craft knife is indispensable for intricate details and curved edges. Always use a cutting mat to protect your workspace.
- Bonding Agent: Glue is your best friend. White PVA glue or a strong craft adhesive works well. Apply it sparingly to avoid warping the cardstock.
- Scoring Tools: This is the secret weapon of papercrafters. A scraper or bone folder helps create crisp, clean folds. Alternatively, a non-working ball point pen can be used to score the lines lightly before bending, ensuring the paper doesn't crack.
- Measuring and Guiding: A ruler is crucial for aligning pieces correctly. Accurate alignment prevents gaps and misshapen curves in the final trumpet body.
Navigating Challenges and Best Practices
Even with clear instructions, papercrafting has its nuances. Understanding these common considerations can save you frustration and improve the final outcome.
Precision in Cutting: When using the craft knife, take your time. Rushing leads to jagged edges, which can make gluing difficult. It is better to cut slightly outside the line and trim later than to cut too deep and ruin a template piece. Remember, you have multiple copies in the PDF if you make a mistake, so don’t stress over minor errors.
Scoring vs. Folding: One of the most critical steps is scoring. Simply bending the cardstock often results in uneven creases. Using a bone folder or the back of a pen to press along the fold lines creates a sharp valley or mountain fold. This technique gives the trumpet its defined shape and allows the flaps to fit together snugly.
Gluing Strategy: Avoid flooding the flaps with glue. Excess moisture can cause the cardstock to bubble or warp. Instead, apply a thin, even layer. Use clips or heavy books to hold pieces together while the glue dries, especially for larger sections of the trumpet body. Patience during the drying phase ensures a rigid final structure.
Digital File Management: The package includes DXF and EPS files, which are vector formats. These are perfect if you want to resize the design for a different scale or print it on a larger format printer. If you lack a color printer, you can print the PDF in black and white and then use markers, paints, or colored tape to add vibrancy. This DIY approach allows for endless customization options.
Why Choose This Specific Design?
The Trumpet - 3d Papercraft stands out because of its balance between complexity and achievability. It is not so simple that it feels trivial, nor is it so complex that it requires advanced engineering knowledge. The 3-hour assembly time strikes a sweet spot, allowing for a focused session without becoming tedious. Furthermore, the dimensions—20 x 16 x 60 CMS—are optimized for display. It is tall enough to be noticed but narrow enough to fit in most corners or shelves.
Additionally, the availability of multiple file formats (PNG, JPG, PDF, DXF, EPS) caters to both casual crafters and more tech-savvy users who might want to modify the design. Perhaps you want to adjust the bell’s flare or change the handle position? Having the vector files empowers you to tweak the design to suit your vision.
Final Thoughts on Creativity
Creating a papercraft trumpet is more than just following instructions; it is an act of bringing imagination into the physical world. It challenges your attention to detail and rewards you with a tangible object that reflects your effort. Whether you are decorating for a special occasion, enjoying a quiet hobby, or teaching someone new about the joys of crafting, this project offers a fulfilling experience.
If you encounter any questions during the process—whether about cutting techniques, glue types, or understanding the templates—remember that the community of papercraft enthusiasts is vast and helpful. Don’t hesitate to seek advice or share your progress. The goal is enjoyment and creativity, and with the right tools and mindset, your Trumpet - 3d Papercraft will be a masterpiece worth displaying.